I've just come to the end of a Zulu Wars / Colonial commission, and the miniatures are now safely on their way to Greece. I've already posted some of the Natal Natives, but I thought some people might like to see the whole unit;
You get 32 plastic miniatures in the kit, making a nice imposing mass of troops. I find there's not as much variety in Warlord kits as you'd get with some of the other major plastics manufacturers (particularly Perry / Fireforge / Wargames Factory), and the way the arms attach is sometimes fiddly / odd... but there's no denying they produce some superbly characterful models. And these are no exception - my photography doesn't really capture it well, but the heads have some great expressions; fatigue, ferocity, trepidation, some even capture that groan that comes with physical exertion when past 40 (I'm familiar with it...).

Not sure why I've chosen to photograph these at this odd angle, but it was about 5am so I wasn't at my sharpest. These are the two European officers for the Natal Native unit, and two mounted British officers. The Natal officers are painted very similarly to the Boers in my earlier post, but with more royal blue in there - to help tie them into a British force without making them too uniformed. As they stand, they could easily be used for extra Boers too. The British officers are painted as requested - one in traditional red jacket / blue trousers, and the other in all blue. Equipment in both cases is mostly white, with black riding boots. The Natal officers, by contrast, use the same sand-coloured equipment as the Boers.

Blurry overhead shot of the Natal unit, taken as an afterthought. The models are separate from their bases, for casualty removal, but are also provided with six- or four-man bases, so the unit can be either used in its entirety (as above), or split into two units of 16 (2 six-bases and a four); or maybe to allow a patrol of six or eight to peel off.
These are the third unit of 18 foot knights I've painted over the last few weeks, part of a very large army a client is putting together;
As with previous units, I've mixed-in a few components from the European Mercenaries and WoTR Infantry sets. Along with the frequently-used bright red of the war-coated figure at extreme right of the picture, I've tried to include some other colours I don't employ quite as often. The orange and green quartered chap towards the left of the picture is sporting a scheme I have employed before on early-medieval foot / mounted from Fireforge; and the pale blue nearer the middle has bee nused as a brighter alternative to the mid- and dark-blues I normally go to.
This is a closer look at the leftmost unit. The kit provides great weapon / arm options - from the upright 'I'm in charge here' pose of the chap in orange and green, to the more menacing 'executioner' of the chap at right front of the image.
Change of camera angle to try and show the rear rank more clearly. The metal effect is my usual metallic paint + ink; and with these miniatures showing so much metal, I've tried to splash colour where I can - sword scabbards, armour straps and belts, and the odd bit of face poking out here and there.

Not much thought given to how these chaps are based! The client is doing a beautiful job of basing these himself, so I just give the moulded base a lick of mid-brown to neutralise it, and he does the good stuff later. I'm sure he'll arrange them better too - despite the huge variety of pose and weapons within the unit, I've managed to put two ostrich-feather helmeted figures on one base. And where the other bases have just one non-white-armoured chap, this base has three! The two rear-rank white-armoured guys are a bit similar in pose too... reminding me of the 'robot ninja' Lothlorien Elves from Pete Jackson's Two Towers LoTR movie. Just goes to show that beautiful miniatures and careful paint jobs / basing are not the whole story when making your units look good. Much thought needs to go into grouping and posing too... though perhaps not so much for those who, like me, masochistically base every single miniature individually, and don't use movement trays or unit bases at all!
Actually, most of these are much less than 25mm tall... but that's the scale anyway! For a lot of people who buy the Games Workshop boxed sets, these are the 'chuckaways' - the miniatures nobody wants, at least to judge by eBay listings. It's a shame too, as they are cheap (in points value) and they've been match-winners for me a couple of times, particularly the archers and particularly in defensive positions. And they're really quick to paint;
First up, some early goblins as featured in the Mines of Moria boxed set. The spiky armour put me in mind of the Morannon orcs, so our large supply of goblins (a set of partially-damaged ones from eBay, and some painted examples bought from a friend) were painted-up as Mordor goblins. Incidentally, I often get asked about repainting plastics, and how to strip the paint. I use Dettol - the brownish antiseptic liquid you can buy for sterilising things. It stinks like a hospital, but it's great for safely stripping plastics.
Take your painted miniatures and cram as many as you can into a clean empty can or jar (or other similar container), then top-up the container with neat Dettol until all the models are covered. Leave for a few hours, then give them a stir. Leave for a few more hours, and stir again - by now, the paint should be lifting away. After stir two, I usually leave them overnight. Once they've had their 24 hours or so, I decant the Dettol back into the bottle via a coffee filter paper (to catch bits of paint), then fill a bowl with warm soapy water (washing up liquid or hand cleaner will do for the detergent) and dunk the miniatures in. A bit of scrubbing with an old toothbrush gets off the stubborn bits. Then rinse in clean warm water and leave to dry. Presto! Nice clean miniatures, ready to paint.
Be aware... Dettol dissolves superglue, PVA etc.. The goblins I did were scenic based, and the blobby mess was like peeling mucus away. For later batches, I just chopped the bases off (which also meant I could fit more into the can).
As for the paintjob, the skin was painted greenish-grey - slightly more green than the orcs, to make them look a little different, younger even. I pushed this idea on with the colour scheme too - using a brighter red for the 'eye' badges and some fabric areas. Metal was painted the way I usually do it - GW Boltgun metal, then inks. The home-made shields are plastic card, deliberately cut uneven and orc-sized so that they looked almost clumsy and unwieldy in the hands of the goblins. This gives them a more defensive look, to remind me not to try using them for headlong charges against ranks of armoured elves...

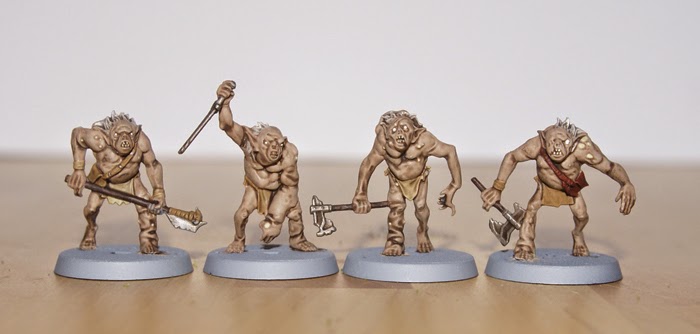
Then along came The Hobbit movies, and a new species of goblin. Not much use, outside of the 'Goblin Town' set they come with, and I toyed with pinching them for my Warhammer Nurgle army (a chaos god who delights in all things rotted / degenerate etc.). In the end, I painted them almost to match the movie ones. They an still be employed in Warhammer 40k games as some sort of degenerate aliens, aligned with Nurgle.
The paint scheme is absurdly simple, as there's not much on them to paint. Grey primer, then a special mix flesh tone (6 parts flesh, 2 parts grey, 1 part dark yellow, 1 part tan). Pick out the buboes in a suitable pus colour, and the eyes in off-white. The straggly hair is light grey highlighted off-white, the clothing / rags is mostly olive drab or tan, and that's about it. Metal weapons are done as for the Mordor goblins, and non-metal weapons usually mid-brown and a sort of 'bone' off white. Then the whole model gets washed in mid-to-light brown.
They came out darker than originally planned, but I was happy with the effect of 'dirt on unhealthy skin'. Some of the sculpts are truly grim - with club feet and arms, withered limbs, hunchbacks etc.. Gloriously horrible.
There's so little equipment on them that I found myself getting quite excited when I found a pouch or pack to paint.
I haven't decided what to do with the bases yet, so they're still in grey primer. I need something which suggests 'cave', but also works with my other based miniatures. Maybe sand and small rocks.
The set also came with plenty of 'Goblin Town' scenery, which I'll put in a separate post.
My favourite models from the whole range of Games Workshop LOTR / Hobbit miniatures are the Mordor orcs. Not only are they wonderful Perry sculpts, both metal and plastic, but they offer easily the widest range of options when it comes to painting. With almost everything else in the range, you have to make a choice between painting exactly as per the movies (as I do with my character models), or else making a conscious deviation (as with my Uruks and Elves). With the orcs, however, you have much more free rein as a painter - because even the movies contain so much variety.

I kept mostly to a greys / browns palette, using the same dark red for the 'eye' badges, and for the odd full shield or garment. The orcs are a pretty tatty bunch, with very little uniformity, so it doesn't take much in the way of colour changes to make them look different. I'd gone with tan skin for the uruks, and greenish for the goblins (see later posts), but plumped for two basic greys for the orcs - a plain mid-grey, and a slightly brownish grey.
The weapon variety on these models is good too, with polearms including naginata-style spears, and tridents like the chap on the right has.
The paintwork all follows the same steps, which helps to maintain cohesion. I generally prime the miniatures in red oxide for two reasons - it shows slightly through grey skin, and makes the orcs look less dead; and it shows clearly where you've painted and where you haven't. Grey primer is not so good for this when painting mostly grey models!

Once primed, I generally pick 3-6 models to paint in a batch. In the case of the chaps above, I was keen to see how they looked in paint because they're slightly converted. I purchased some very cheap damaged models from eBay, and repaired them with spares from the box. Pretty much anything goes, so the chap in mostly metal armour received a spare sword from unknown sources, but which fitted nicely where the original weapon had snapped off. The chap to his right had a broken two-handed weapon - which is a trickier fix - so I gave him a spare shield from the Wargames Factory orcs, and a cut-down halberd from the Perry European Mercenaries set. He probably scavenged it from some hacked-up Gondorian soldier.

Next stage is to paint-in the metal areas. I use GW Boltgun Metal for this, then wash it with thinned brown ink after drying. Next, I paint in the exposed skin. After that, it's a case of choosing a main colour (say, blue-grey) and applying it to different areas of each miniature I move along the line. So, from left to right, chap #1 gets sleeves, chap #2 gets a hood, chap #3 gets sleeves, and chap #4 gets none. Clean the brush, swap to dark red, and #1 gets a hood, #2 gets a robe, and so on.
Early on, I reserve a couple of colours for equipment - typically this is a light brown / tan for polearm hafts, and a mid brown or red-brown for packs / belts / gubbins. Once reserved, I don't use these colours anywhere else on the model (very rarely anyway, there are exceptions).

Once all the colours are blocked-in, and the equipment painted (and hair, here and there, which I usually paint black), I put some limited highlights on colours and areas which look too 'flat'. This is rarely needed with bold colours like the blood red or the dark yellow, but the blue-grey needed a 'lift', and so did the light grey (in the examples above). Highlights are usually the base colour with white or neutral grey added - nothing which will change the tone. If your base colour is prussian blue, and you highlight with ultramarine (or eggshell, or teal, or whatever) the highlights - to me - just look painted-on. Even if you do a top-notch blending job, there's no getting away from the obvious tone-change. This can be useful if you're after that sort of shimmering 'multi-tonal' look, but plain cloth doesn't do that. It fades unevenly, and catches / reflects the light differently here and there, but at some point it was all one colour, and presumably the garment (apart from stains) has been subjected to the same environmental stresses. An obvious exception is black - which fades to green, purple, blue... any number of shades - so if you're highlighting black, pick one and stick with it, is my advice.

When the highlights are dry, it's time to wash. This is not a simple 'dip and dry' operation, but careful brush-application of successive washes of a basic brown which is sometimes lightened or darkened depending on what look good on the subject. The wash serves two basic purposes; it shades the model, and it tones down the colours. I usually paint brighter than the end result is going to be, and shade down; rather than start off dark and highlight-up, or start in the middle and work both ways. I find this reduces eye-effort, as the colours are easier to follow - though it doesn't work with black!

I like a bit of gleaming metal, so I don't usually wash over the metal areas (the earlier ink wash takes care of the shading). I don't normally add dirt either - this is a subtle thing to suggest, and is far too easy to overdo. Thankfully, the brownish washes do a fine job of suggesting dirt and wear, especially since gravity sends more pigment to the trailing edges of cloth, or to the boots / shoes.
Where the 'eye' badges are painted onto metal, this is done last so it doesn't get ink and go shiny. I've used a darker colour on the spear hafts here, as I'd used lighter browns on the miniatures, and wanted the contrast.
I used the darker brown for bows too (except where the impractical-looking blades go...). As with all non-shield-bearing miniatures, it's hard to know where to put things like 'eye' symbols; so some end up on armour or helmets, some on clothing, and some on quivers or bow cases.
In some cases, as with these archers, the space is too tight really. So painting an area (or object, or piece of clothing) in the same dark red is my attempt to tie the unit together even without the 'eye' badges.
More archers, two of which are doubles of pictures further up. Even with my 'vary the clothing item and colour' approach, you can still end up with near-identical miniatures The archer with the 'Batman' helmet (2nd from left, above) only differs from his twin by the colour of his hood really.
Couple of attempts made at small 'eye' symbols here - the other two have to make do with dark red quivers.
The Lord of the Rings and The Hobbit Strategy Battle Games (from Games Workshop) are, if you're not familiar with them, very much geared towards skirmish-level gaming, with very powerful character / leader models. Whole units of ordinary troops can be trounced by a powerful character (as indeed they are in the books / movies); and units of otherwise broken or mediocre troops can be made very effective just by sticking a character with them. As a bonus, the Perry-sculpted miniatures are beautiful.

Legolas and Boromir, two of my favourite characters both from the book and the movies. Correct me if I'm wrong, LOTR fans, but I don't recall sandy hair and a beard ever being mentioned about Boromir in the book... and yet the Ralph Bakshi cartoon and the Pete Jackson movies have both styled him so. Anyhow, these are both lovely sculpts, and were a joy to paint. I've tried to copy the movie colour scheme - and yes, I need to paint the eyes in now! Honestly, you don't notice when they're on the table, the miniatures are so tiny compared to the current trend for 28-35mm steroid giants.

The rear view of Orlando and Sean. I tip my hat (once again) to the brilliance of the sculpting here. The rear view captures the 'weight on the back foot' stance of both characters, but with a subtlety that indicates, if pushed, Legolas will simply dance around you and shoot you dead. Boromir, on t'other hand, would just knock you flat. Just thinking... is there a design on Boromir's shield? I need to watch the movies again.
Ladies favourite Aragorn, paired with his really old friend Gandalf. I've deviated from the movie colour scheme to make Gandalf's hat brighter and robes lighter - otherwise he's a bit grey. Yes, I know he's meant to be, but what looks good on Sir Ian doesn't alwys work at 25mm tall. I've seen other Gandalf miniatures (other Perry ones, that is) with sexier poses - but the Aragorn here is my favourite. His whole stance shows that he's facing probably dozens of opponents, without you needing to put the models down in front of him.
Rear view of the two 'main men'. Aragorn's long coat, and Gandalf's robes, mean that the poses get a bit lost in the rear views... but to balance that, the highlighting and shading work was more fun. The skin tone is a bit 'sunbed' compared to movie stills, but nobody stays pale if they really wander the wilderness all day - not even in winter.
Sam and Frodo, in case the names on the bases don't give it away, haha. Probably the least exciting of the character models in this post, though I do like the 'offensive' Sam paired with the 'defensive' Frodo. Okay to paint, moderately useful on the battlefield, and yes... they need eyes!
Rear view of the two 'serious' hobbits.
And a front view of the two 'comedy' hobbits. Again, I've tried to go with the movie colour scheme, brightening here and there to heighten contrast and avoid these tiny figures getting lost under the paint.
Rear view of the Took and the Brandybuck. It's a nice touch to sculpt one with his pack / bottle worn on the hip, and the other over his back. Helps to ring the changes on what would otherwise be two difficult-to-distinguish models.
The Hobbit version of Bilbo, paired with a home-made Hobbit archer (more on these chaps in a later post). Not much to say about Bilbo - he's a lovely sculpt, you get the option of sword or stick, and he really does look like Martin Freeman. When I redo him (to get the eyes in), I might also paint his sword, Sting, a bit more blue. The 'orc glow' doesn't really show.
Thorin and Kili from The Hobbit 'Goblin Town' boxed set. Every single model in that kit is amazing - the dwarves particularly. I had to sit with my son's 'The Hobbit' annual to make sure I was as close as my skills allow to the appearance of the characters in the movie, as the models don't miss a detail! Nerve-wracking stuff. I don't like painting blue, but it looks good on these two I think.
Rear view of Thorin and his cousin (nephew? something like that, anyway). I know they feature in both book and movie, but I can't get my head around dwarf archers. Just a personal thing. I always feel they should have crossbows, or firearms. Something more technical than a bendy stick with a string on, anyway.
Gimli - another great miniature with far more detail on it than I've exploited here. The beard needs highlights, and the coat is too plainly-done. A shame, as I really like the character, and he's awesome on the tabletop. Keep an eye out for the redone miniature at a later date!
Gimli's stance works well from the rear too - a sort of 'go on then, have a go' challenge to any foe. Hard to pose him any other way, I suppose, as his proportions and multi-layered clothing sort of restrict how dynamic he can appear. The dwarves in the Hobbit movies are less squat, and much easier to imagine leaping about and dashing here and there.
I love the Pete Jackson Lord of the Rings movies, and the licensed miniatures from Games Workshop (despite the horrendous expense!) are Perry miniatures - and hence awesome. My son likes the bad guys, so we started with a box of Uruk Scouts and a box of Easterling infantry. A friend of mine sold us his collection of very early LOTR miniatures, including orcs, more Uruks, and some humans / elves for them to fight - plus the rules and some character models. eBay and a few of his birthday gifts provided more orcs, some Rohirrim, and more orcs, and some more Uruks, and some more orcs... and, well, suffice it to say that the hordes of darkness are not short a soldier or two.

Early on, we decided not to paint these as Saruman's troops - so no white hands! Instead, they all get a crude 'Eye' badge somewhere on them. Apart from the amended paint job, these are out-of-the-box miniatures. The lack of 'eyes' painted-in on the bare headed miniatures is not noticeable when you're gaming, but sticks out like a warning beacon in these pictures. I'm going to dust them down, paint the eyes and teeth in, then post them again - let you decide whether they look better!
Colours used were mostly fairly dull - dark yellows, sand, light browns. I used a Games Workshop colour 'Dark Flesh' for the skin, though since I'd primed them in red oxide primer, I could easily just have shaded-down from the primer and got a similar (albeit more matt) effect.

The metal areas are GW Boltgun Metal, washed with thinned brown ink to give a 'dirty-but-gleamy' effect. In the movie, the uruk scouts are mostly in leather armour - but a bit of metal here and there helps break up the brownness. And maybe The Great Eye can just afford more metal. Speaking of which, the chap on the left of the above shot has a home-made shield from 30 thou plastic card. The shield is useful in the game, as well as giving the miniature something to do with his left hand. It's just two pieces of slightly tapering 30 thou plastic sheet, chamfered to 60 degrees or so where they meet. The spikes are two 'chips' of plastic sheet, roughly triangular. Not as movie-faithful as the Perry sculpts, but they blend in okay.
The bases are too green... the idea was to replicate Rohan / Gondor / other places the evil uruks might attack. While repainting the faces, I think I'll scrape some green and patch it up with sand and rocks, to better match my current basing style.
Another home-made shield second from left. The heavy 'cleaver' type sword is my son's favourite uruk weapon, so we've got loads of these guys. Personally, having played the game, if I started from scratch I'd have an all-archer force. Missile weapons are better in GW's LOTR game than in many other rule sets.
And here they are - some uruk archers. I don't like the blades on the bows, but they feature in the movie so I haven't scraped them off. Yet.
More archers. It's not always easy to find a spot for the 'eye' badge, when models are shield-less, so some of the archers have painted quivers.
The two on the right of the picture have been modified slightly. My son doesn't like too many bare heads, preferring helmeted troops. So I partially-decapitated two of the bare-headed archers and filed-down Perry Wars of the Roses helmeted heads to fit. The middle guy looks good - but the chap on the right has the helmet set too high. One day, when I'm feeling brave, I'll pop it off and trim another half millimetre off it.

I bought the Wargames Factory orc plastic kit because it was very cheap. The bodies and legs are really good, though I wasn't so sure about the some of the weapons and arms, which didn't look so hot. I had in mind a sort of 'mercenary orc' idea - professional orc crossbowmen marking themselves out on the battlefield with a distinctive colour scheme (dull yellow). I used spare Perry Miniatures European Mercenaries crossbow arms (which worked okay, though the chap on the left looks like he's wearing a fashionably-baggy parachute shirt from the late 80s), and used spare GW Space Marine ammo pouches for their bolt-cases. The greaves are from the Warlord Games Roman veterans kit. Overall, I wasn't happy with the result - not everything I dream up does!

Attempt number two. This time, I left off the yellow garments, and attempted to wedge Perry crossbows into the Wargames Factory arms. The end result was, from left to right, a homicidal gorllia, an uruk who looks like he's lifting a bolt so heavy it must be made of uranium, and a chap who doesn't know which way up his crossbow goes. Hmm... a fix is needed, and here's the plan; Step one - hack off the WF heads and replace with Perry medieval heads (opening and enlarging some of the mouths / jaws here and there); Step two - repaint the yellow in dark grey / dark brown; Step three - lose the WF arms, replace with more Perry arms. I'll repost the 'after' shots and let you judge for yourselves.
One last view of a slightly more successful modification. The chap in the middle of the above shot has a home-made shield, and a butchered Perry helmet. Again, it's just too high up - needs to be chopped down by half a millimetre or so.